Mini Bundt Cake Recipes The most pervasive frustration in the world of small-batch baking is the “stuck-cake syndrome.” We have all experienced that moment of culinary heartbreak: you’ve meticulously prepared your batter, the kitchen smells of toasted vanilla, and the cakes have risen beautifully, only for half of the sponge to remain fused to the intricate crevices of the pan upon inversion. Because mini bundt cake recipes rely on high surface-area-to-volume ratios, they are prone to drying out or becoming structurally compromised by improper release techniques.
A professional-grade mini bundt cake requires a departure from standard cupcake logic. To achieve that iconic, sculptural definition and a moist, velvet-like interior, you must master the science of “pan-prep” and fat-emulsification. This guide deconstructs the best mini bundt cake recipes, focusing on a versatile Vanilla Bean and Buttermilk base that serves as a structural blueprint for any flavor variation.
Why This Recipe Works
This approach to individual bundt cakes succeeds by balancing crumb density with high-moisture retention.
- The “Cake Release” Double-Down: Unlike standard muffins, these cakes require a specialized barrier. We utilize a “homemade cake goop”—a mixture of equal parts oil, shortening, and flour—which creates a non-stick film that survives the high-sugar caramelization process.
- Buttermilk’s Acidic Tenderization: We prioritize buttermilk over standard milk. The lactic acid breaks down the long gluten strands in the flour, ensuring that despite the firm structure needed to hold the bundt shape, the bite remains incredibly tender.
- Reverse Creaming Potential: By coating the flour in butter before adding liquids, we minimize gluten development. This ensures your mini bundt cakes have a tight, professional crumb rather than a bread-like texture.
- Thermal Precision: Because of their small size, these cakes are sensitive to “carry-over” baking. Our timing accounts for the heat retained by the heavy-duty cast aluminum pans commonly used for bundts.
Ingredients & Measurements
For a standard yield of 12 mini bundt cakes, precision in the weight of your dry ingredients is the key to consistency.
The Structural Base
- 2 ½ cups (315g) All-Purpose Flour: Provides the necessary strength for the intricate molding.
- 1 tsp Baking Powder & ½ tsp Baking Soda: The dual-leavening ensures a steady rise without “mushrooming” over the edges.
- ½ tsp Fine Sea Salt: To sharpen the vanilla and butter notes.
The Moisture and Fat
- 1 cup (225g) Unsalted Butter: Softened to exactly 65°F (18°C) for optimal aeration.
- 1 ½ cups (300g) Granulated Sugar: Fine crystals help create a delicate air-cell structure.
- 3 Large Eggs: Room temperature to ensure they emulsify seamlessly with the butter.
- 1 cup Full-Fat Buttermilk: Shake well before measuring.
- 2 tsp Vanilla Bean Paste: Provides those classic black specks and a deeper aroma than extract.
Step-by-Step Cooking Guide
1. The Critical Pan Preparation
Preheat your oven to 325°F (165°C). Lower temperatures are better for mini bundt cake recipes to prevent the exterior from browning before the center is set. Using a pastry brush, apply your non-stick agent into every groove of the mini bundt pan. Pro Tip: Never use “butter and flour” alone; the milk solids in butter act like glue. Use oil-based sprays or shortening-flour pastes.
2. The Creaming Phase
In a stand mixer fitted with the paddle attachment, beat the softened butter and sugar on medium-high for a full 5 minutes. The mixture should transition from yellow and gritty to pale, almost white, and incredibly fluffy. This is where you build the air pockets that prevent a “heavy” cake.
3. Egg Emulsification
Add the eggs one at a time, beating for 30 seconds after each addition. If the batter looks “curdled,” it’s likely your eggs were too cold. Continue beating; it will come back together as the friction warms the fats.
4. The Alternating Addition
With the mixer on low, add one-third of the dry ingredients, followed by half of the buttermilk and vanilla. Repeat, ending with the dry ingredients. Mix until just combined. Over-mixing at this stage will result in “tunnels” inside your mini cakes.
5. Proper Filling Technique
Do not pour the batter directly into the pans. For professional mini bundt cakes, use a large piping bag or a large cookie scoop. Fill each cavity only 2/3 full. This prevents the “muffin top” that makes the cakes sit crookedly when inverted. Rap the pan sharply on the counter three times to burst any trapped air bubbles.
6. The Bake and the “Golden Window”
Bake for 18–22 minutes. At the 18-minute mark, insert a wooden skewer. It should come out with a few moist crumbs clinging to it.
7. The 10-Minute Rule
Let the cakes sit in the pan for exactly 10 minutes. This is the “setting” phase. If you flip them immediately, they are too fragile; if you wait until they are cold, the sugar will have “glued” them to the pan. After 10 minutes, place a cooling rack over the pan and invert in one confident motion.
Common Mistakes to Avoid
- Cold Ingredients: If your buttermilk or eggs are cold, they will seize the butter, leading to a dense, uneven bake.
- Over-Filling: Bundt pans are sculptural. If the cake rises over the top, the “foot” of the cake becomes wider than the mold, making it impossible to remove cleanly.
- Using “Light” Buttermilk: Low-fat versions lack the viscosity needed for a rich, professional crumb.
- Aggressive Washing: Never scrub your mini bundt pans with abrasive sponges; you’ll create microscopic scratches that “grip” the batter in future bakes.
Timing & Doneness Indicators
Serving Suggestions
Because mini bundt cake recipes are naturally elegant, they require minimal garnish to look professional:
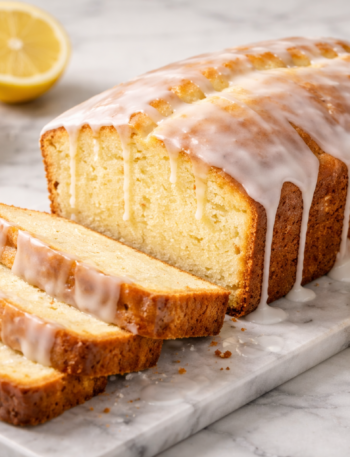
- The Classic Glaze: Whisk 1 cup of powdered sugar with 2 tbsp of heavy cream. Drizzle over the cooled cakes so it follows the lines of the mold.
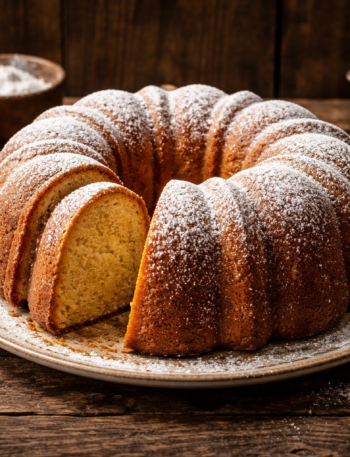
- The “Sugar Dust”: For a rustic look, a simple dusting of snow-white powdered sugar highlights the intricate details of the bundt shape.
- The Fruit Well: Fill the center hole of the mini cake with fresh raspberries or a dollop of lemon curd.
- The Ganache Dip: Dip the tops of the cakes into a warm chocolate ganache for a high-contrast, sophisticated finish.
FAQ: Solving Your Mini Bundt Frustrations
Q: My cakes always have air pockets and holes on the surface. How do I fix this? A: This is caused by air trapped in the intricate design of the pan. After filling the cavities, use a small spoon to “smear” the batter up the sides of the mold. This ensures the batter reaches every detail before the cake begins to rise.
Q: Can I use a regular box mix for mini bundt cakes? A: Yes, but box mixes are often too light and airy for the heavy molding of a bundt pan. If using a mix, add an extra egg and use milk instead of water to increase the structural integrity.
Q: Why did my cake crumble when I took it out of the pan? A: This usually happens because the cake was too hot (under 10 minutes rest) or the recipe had too much sugar/shortening and not enough flour “frame.” Ensure you use the 10-minute cooling rule.
Q: Can I freeze mini bundt cakes? A: Absolutely. These are perfect for meal-prep or party-planning. Wrap unglazed cakes tightly in plastic wrap and freeze for up to 3 months. Thaw at room temperature for an hour before glazing.