Simple Cake Popsicles Recipe Why do my cake popsicles keep falling off the stick or cracking as soon as I dip them?” This is the most common frustration in the “cakesicle” world. Usually, it comes down to two culprits: weight and temperature. If your cake-and-frosting mixture is too oily or heavy, gravity simply wins. More importantly, if the cake center is freezing cold and your chocolate coating is warm, the chocolate will contract as it cools while the cake expands slightly as it thaws, leading to those dreaded hairline fractures. We solve this by ensuring both elements are as close to room temperature as possible during the final assembly.
“Do I really need to bake a cake from scratch just to crumble it up?” The short answer is: absolutely not. In fact, slightly “stale” or day-old cake often works better because it absorbs the binding agent (frosting or ganache) more predictably. Whether you use a boxed mix, a leftover sponge from a previous project, or even a high-quality store-bought pound cake, the result will be excellent. The magic isn’t in the baking of the cake itself, but in the ratio of crumb to binder.
“Can I use regular chocolate chips for the coating, or do I need special melting wafers?” While you can use chocolate chips, they are designed to hold their shape under heat, meaning they don’t flow as smoothly and can result in a thick, clumpy shell. For a professional, high-gloss finish that snaps when you bite into it, I recommend high-quality compound chocolate (melting wafers) or tempered couverture chocolate. If you must use chips, adding a teaspoon of coconut oil helps thin the consistency to a manageable level.
Introduction Cake Popsicles Recipe
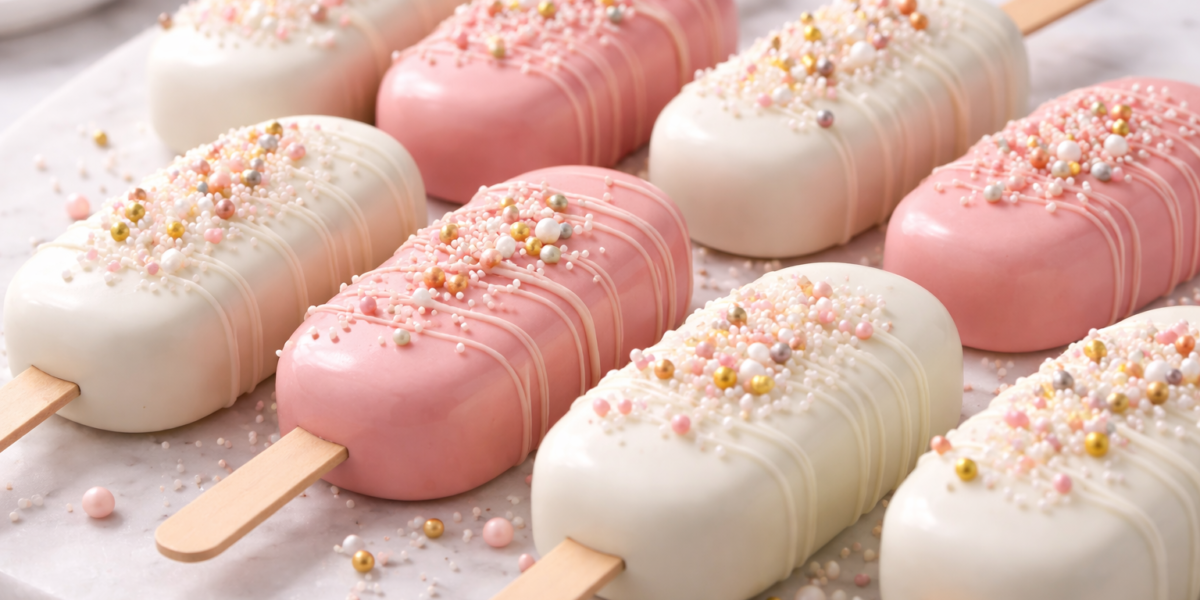
The “Cakesicle”—a sophisticated, popsicle-shaped evolution of the traditional cake pop—has taken the confectionery world by storm. Unlike its spherical predecessor, the cakesicle offers a larger canvas for decoration and a more substantial dessert experience. Structurally, it is a hybrid: part truffle, part sculpture, and entirely indulgent.
However, the transition from a simple cake pop to a molded popsicle introduces architectural challenges. You are no longer just “dipping” a ball; you are creating a structural shell within a silicone mold and “welding” a cake center inside. This guide is designed to deconstruct that process, moving away from guesswork and focusing on the precision required to create a dessert that looks like it belongs in a high-end boutique window.
Ingredients
To create approximately 10 to 12 cakesicles (depending on the size of your mold), you will need the following components categorized by their structural role.
The Core (The “Dough”)
- 4 cups Cake Crumbs: (Approx. one 9×13 inch cake). Vanilla, chocolate, or red velvet are standard, but ensure the cake is completely cooled before crumbling.
- 1/4 to 1/2 cup Binder: You can use buttercream frosting, cream cheese frosting, or even a thick chocolate ganache.
- Note: Start with the smaller amount. You want the consistency of “play-dough”—pliable but not greasy.
The Shell
- 16 oz (450g) High-Quality Coating Chocolate: Compound chocolate or candy melts are best for beginners. If using real chocolate, it must be tempered.
- Optional: Gel-based food coloring (if using white chocolate). Never use water-based coloring, as it will cause the chocolate to “seize” and turn into a gritty paste.
Equipment
- Silicone Cakesicle Molds: These usually come in “mini” or “standard” sizes.
- Wooden Popsicle Sticks: Ensure these fit the slots in your specific mold.
- Small Offset Spatula: For leveling the chocolate.
- Piping Bags: For a clean distribution of the chocolate shell.

Instructions
Step 1: Preparing the “Dough”
Crumble your cake into a large bowl until no large chunks remain. Add your binder one tablespoon at a time. Use your hands to mix until the crumbs hold together when squeezed in your palm. If the mixture is too dry, it will crumble inside the shell; if it’s too wet, it will be heavy and oily. Aim for a matte finish that holds its shape.
Step 2: Creating the First Shell
Melt your chocolate in 30-second bursts in the microwave, stirring well between each interval until completely smooth. Place about 1 to 2 tablespoons of chocolate into each cavity of the silicone mold. Using a clean paintbrush or the back of a spoon, coat the bottom and sides of the mold thoroughly. Crucial: Pay extra attention to the top edges. If the edges are thin, the shell will shatter when you try to de-mold it.
Step 3: Inserting the Sticks
While the chocolate is still wet, slide your popsicle sticks through the designated slots in the mold, then pull them out about halfway. This ensures the slot remains clear of chocolate. Place the mold in the refrigerator for 5 to 10 minutes to set.
Step 4: The Second Coat (Optional but Recommended)
For a truly professional finish, apply a second thin layer of chocolate specifically to the “shoulders” or top edges of the mold. This reinforces the structure. Let it set again for 5 minutes.
Step 5: Filling the Cavities
Take a small amount of your cake mixture and press it into the chocolate-lined mold. The “Gap” Rule: Leave about 1/8th of an inch of space at the top. If you overfill, you won’t be able to seal the back with chocolate, and your cake will be exposed. Once the cake is pressed in, push the popsicle stick all the way into the cake mixture. The cake will act as the “anchor” for the stick.
Step 6: Sealing the Backs
Pipe or spoon melted chocolate over the exposed cake. Use an offset spatula or a bench scraper to scrape away the excess chocolate so that it is perfectly flush with the mold. This ensures your cakesicle has a flat, professional back.
Step 7: The Final Set and De-molding
Chill the mold in the refrigerator for at least 30 to 45 minutes. To de-mold, gently peel the silicone back from the edges of the chocolate, then use the stick to push the cakesicle upward and out of the cavity. Handle with care; the heat from your fingers can smudge the glossy finish.
Timing Details
Precision in timing prevents most textural failures. Use the following table as a benchmark:
Mistakes to Avoid
1. Using the Freezer for “Speed” It is tempting to put the molds in the freezer to save time. However, this causes the chocolate to undergo extreme temperature shock. When you move it to room temperature, the chocolate will develop “bloom” (white streaks) or “sweat” (condensation), which ruins the aesthetic and can make decorations slide off.
2. Over-Mixing the Binder If you use too much frosting, you are essentially making a fudge rather than a cake dough. This makes the filling incredibly dense and difficult for the stick to hold. The texture should still feel like cake, just “moistened” cake.
3. Ignoring the “Stick Slot” If chocolate hardens in the slot where the stick goes, you will have to “break” the chocolate to get the stick in, which often shatters the entire shell. Always clear the path with the stick while the chocolate is wet.
4. Under-filling the Sides The sides of the cakesicle are the weakest point. If you see the “shadow” of the cake through the chocolate, your shell is too thin. A double-coat on the sides is always safer than a single thick coat on the bottom.
Storage
Proper storage ensures the “snap” of the chocolate is preserved.
- Short Term (1-3 Days): Cakesicles are best kept in a cool, dry place in an airtight container. If your house is warm, use the refrigerator, but place paper towels in the container to absorb any moisture.
- Long Term (Up to 2 Weeks): They can be refrigerated for up to 14 days. If you have decorated them with fondant, be aware that fondant can become soft or “weep” in the fridge.
- Freezing: You can freeze cakesicles for up to 3 months. However, the chocolate shell may lose its high-gloss shine upon thawing. To defrost, move them from the freezer to the fridge for 24 hours, then to the counter, to minimize temperature shock.